
Here is one Visual Studio tip from my colleague Gwyn Peña-Siguenza which I didn’t know about! Yes, even after 26 years using this fantastic tool, I am still discovering new features. So thanks to Gwyn for this!! This is all about deleting lines, and using the Windows Clipboard for support.
You can see the short video on our YouTube channel, and there is also a longer video with 20 must-know shortcuts here. Don’t forget to subscribe if you want to learn more tips!
Using the Clipboard History in Windows
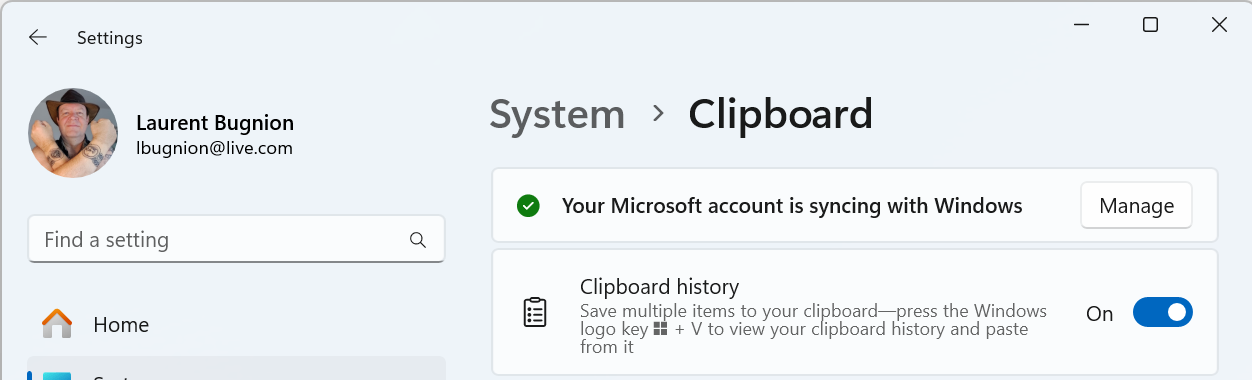
One of my favorite tools on Windows is the Clipboard History. This feature was introduced in Windows 10 and is seriously adding productivity to my day-to-day. If you haven’t been using it, you need to enable it in the Windows settings. Simply follow the steps:
- Go to the Windows Settings
- Search for Clipboard settings
- Enable “Clipboard History”
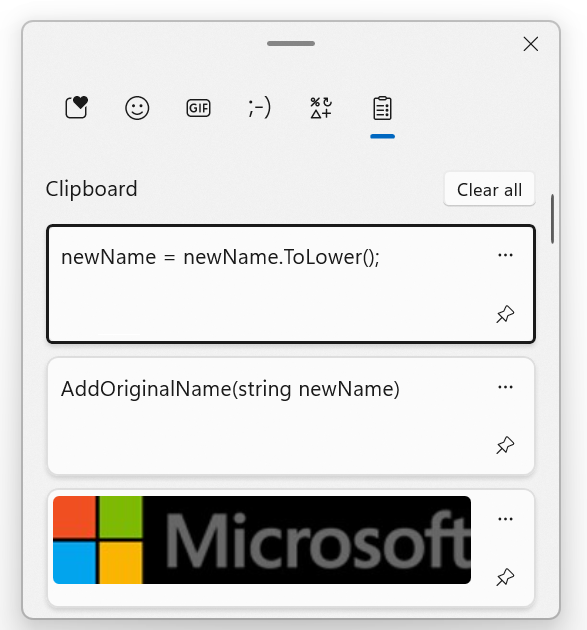
To test that this works, try the following:
- Copy one piece of text using Ctrl-C
- Copy another piece of text using Ctrl-C again.
- Press the Windows key and the V key together (Win-V)
- This brings up a new window where you should be able to see the two entries you just copied at the top.
This enables you to copy multiple pieces of content in a document without having to always Ctrl-Tab back and forth between the original document and the target document. And the cool thing is that it even supports images!
Deleting a line with clipboard support
So why am I bringing this up? Well another thing that we do quite often in code is deleting lines. There’s even a joke that the best developers are not the one writing a lot of lines of code, but those who delete a lot of lines of code 🙂
In order to delete a whole line, most people would follow these steps:
- Place the cursor on a line of code.
- Move the cursor to the top of the line with the Home key.
- If the line was indented, press Home once again to ensure that the cursor is really on column 0.
- Press the Shift key.
- With the Shift key pressed, move the cursor at the end of the line with the End key.
- With the whole line selected, press the Delete button.
- Probably you will also have to press Delete once more to delete then empty line.
This is a lot of steps for a simple operation that we do a LOT in a developer’s day. Thankfully you can simplify it.
- Place the cursor on a line of code.
- Press Ctrl-L.
That’s it. The line is deleted and there is no empty line remaining where it was. but the best part is, this line was saved in the Clipboard! To test this, simply press Win-V and you should see the line you just deleted on top of the history. Of course this also works for multiple lines.
Deleting a line without clipboard support
Now, sometimes you don’t want the deleted line(s) to be saved to the Clipboard history. In this case, follow these steps:
- Place the cursor on a line of code.
- Press Ctrl-Shift-L.
This way you can keep your Clipboard history tidy.
More tips about Visual Studio
Hopefully these tips help you to be more productive! And if you want to learn more about key shortcuts in Visual Studio, you should watch Gwyn’s 5:30 minutes video on the Visual Studio YouTube channel.