The Trim command is a user favorite—and for good reason. It’s incredibly easy to use, and users often find that it’s faster to rough in geometry and then trim it than to be perfect the first time. The command has evolved over time and now offers two ways to trim. Here, we’ll explore both methods and the various object selection options available to you.
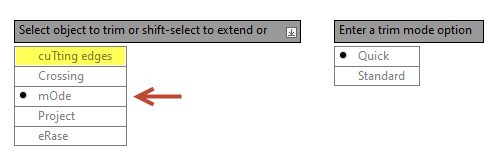
Standard Mode Trim
This may seem odd, but I’ll start with the non-default mode or Standard Mode. You could also think of this as Classic Mode, as it is how Trim worked for many years.
The first thing to know is that you can switch to use Standard Mode all the time by specifying Mode and then Standard or while in Quick Mode, you can Select Cutting Edges (or type T) to temporarily allow the selection of cutting planes.
For clarity, I’ll be using Dynamic Input to show these options, but they’re also available on the command line or within the contextual right-click menu.

In Standard Mode, you evaluate what needs to be trimmed, then find or create a cutting plane (or planes). Launch the command, select your planes, pop the spacebar with your thumb (to get out of plane selection mode), and select what you want to trim.
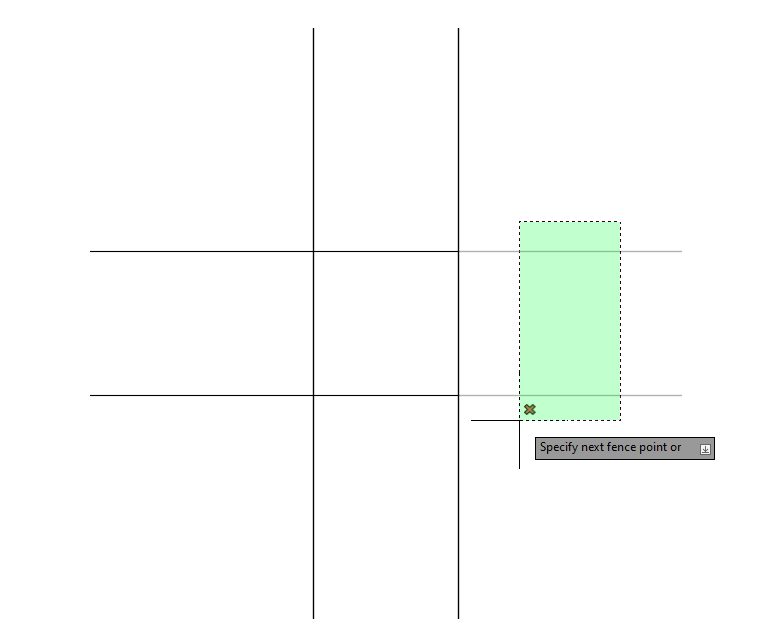
Somewhere along the line, Trim changed its cutting plane philosophy. Now, you can hit enter at the cutting plane prompt, and it will select everything for you. Take the example image below. You want to trim the line extensions on the right. It’s faster to let AutoCAD consider everything to be a cutting plane than to manually select the vertical line on the right.
I don’t care if the left vertical line is defined as a cutting plane, too, because I won’t use it anyway. Users really liked this new feature, as it was extremely efficient.
Quick Mode Trim
In AutoCAD 2021, Trim was updated to add a new default mode called Quick Mode. I’ll admit that it took some getting used to, especially for some of us AutoCAD dinosaurs. But it really is a better and quicker way to use Trim.
Now, instead of having the step of selecting cutting planes (or specifying all), it just assumes you want to use everything possible as a plane and takes you right to the object selection phase of trimming. Let’s look at some of the options available.
As for object selection, you’ve got a lot of options available to you. When you start the command, you’ll get a pickbox allowing you to select your items individually.
Possibly, the most popular option is to hold your left mouse down and drag the cursor over the items you want to trim. Technically, this is a free-hand lasso selection. It’s also rather satisfying in some odd, geeky way. The image below shows all your selection methods.

One More Thing… How to Trim a Hatch
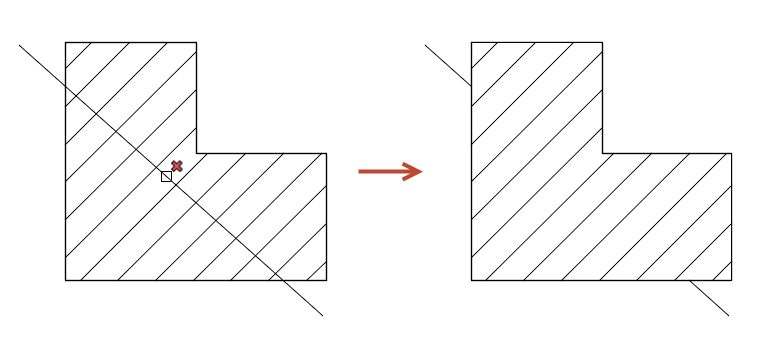
What about hatches? How do they react to Quick Mode trimming? By default, they’re ignored as being cutting planes. We can see the result of a trim involving a hatch in the following image.
However, a hatch can be trimmed like other object types. Again, refer to the image below.
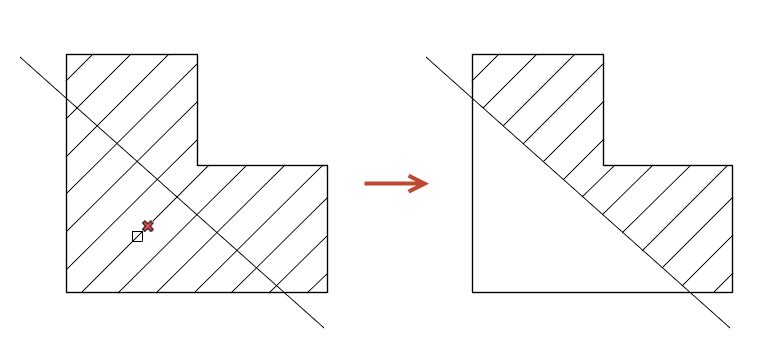
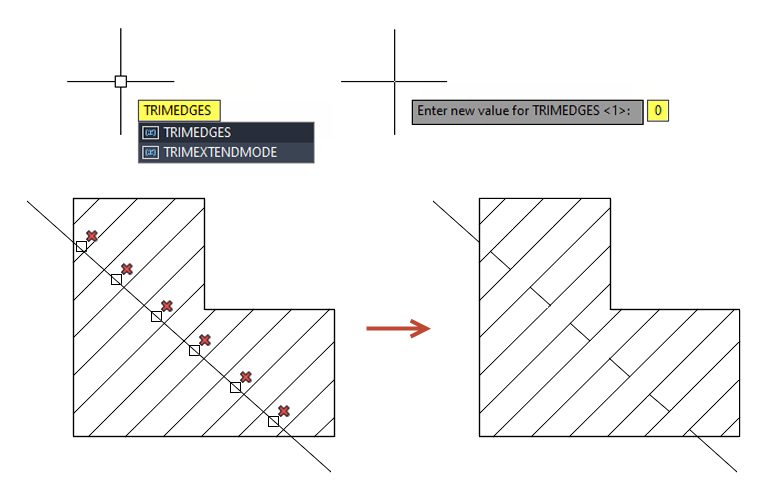
What if you don’t want Trim to ignore a hatch as being cutting planes? In other words, you don’t want what we saw in the first example? That’s where the variable TRIMEDGES comes in. It’s one of those on/off switches which is set to 1 or on by default. Change it to zero, or off, and now the individual lines in a hatch act as cutting planes, as shown below. TRIMEDGES is saved in the registry, so change it once, and it will stay that way until you change it back.
Bonus Tip
There’s one more tip for you. You may have noticed it in the dynamic select object prompt. If you hold down the shift button on your keyboard while selecting, the command will Extend instead of Trim. And it does just the opposite if you’re running the Extend command. How’s that for a lot of power?
That’s All Folks
The new functionality in Trim really has made it better, and if you do find that you need to specify your cutting planes, it’s easy to either override the automatic selection or simply change modes.
With its different modes, selection choices, and ability to morph into a different tool, it truly is the Swiss Army Knife of your modification toolbox.
More Tuesday Tips
Check out our whole Tuesday Tips series for ideas on how to make AutoCAD work for you. Do you have any favorite AutoCAD tips? Tell us in the comments!
The post How to Trim in AutoCAD: Tuesday Tips With Frank appeared first on AutoCAD Blog.